Basic HTML Version


www.scrapbookandcards.com
53
the 3 i’s
supplies
CARDSTOCK,
Stampin’ Up!;
PATTERNED PAPER,
Jillibean Soup;
TRIM,
May Arts;
BUTTON,
Papertrey Ink;
JUTE
STRING,
American Crafts;
CUTTING FILE,
Silhouette;
DISTRESSING TOOL,
Tonic Studios;
CORNER ROUNDER,
We R
Memory Keepers;
ADHESIVE,
Scrapbook Adhesive by 3L
supplies
CARDSTOCK,
Stampin’ Up!;
PATTERNED PAPER,
Echo
Park, My Mind’s Eye;
DIES,
Sizzix, Spellbinders;
EMBOSSING
FOLDER, STAMPS,
Sizzix;
INK,
Tsukineko;
TWINE,
Timeless Twine;
TRIM,
Love My Tapes;
DISTRESSING TOOL,
Tonic Studios;
ADHESIVE,
Scrapbook Adhesives by 3L
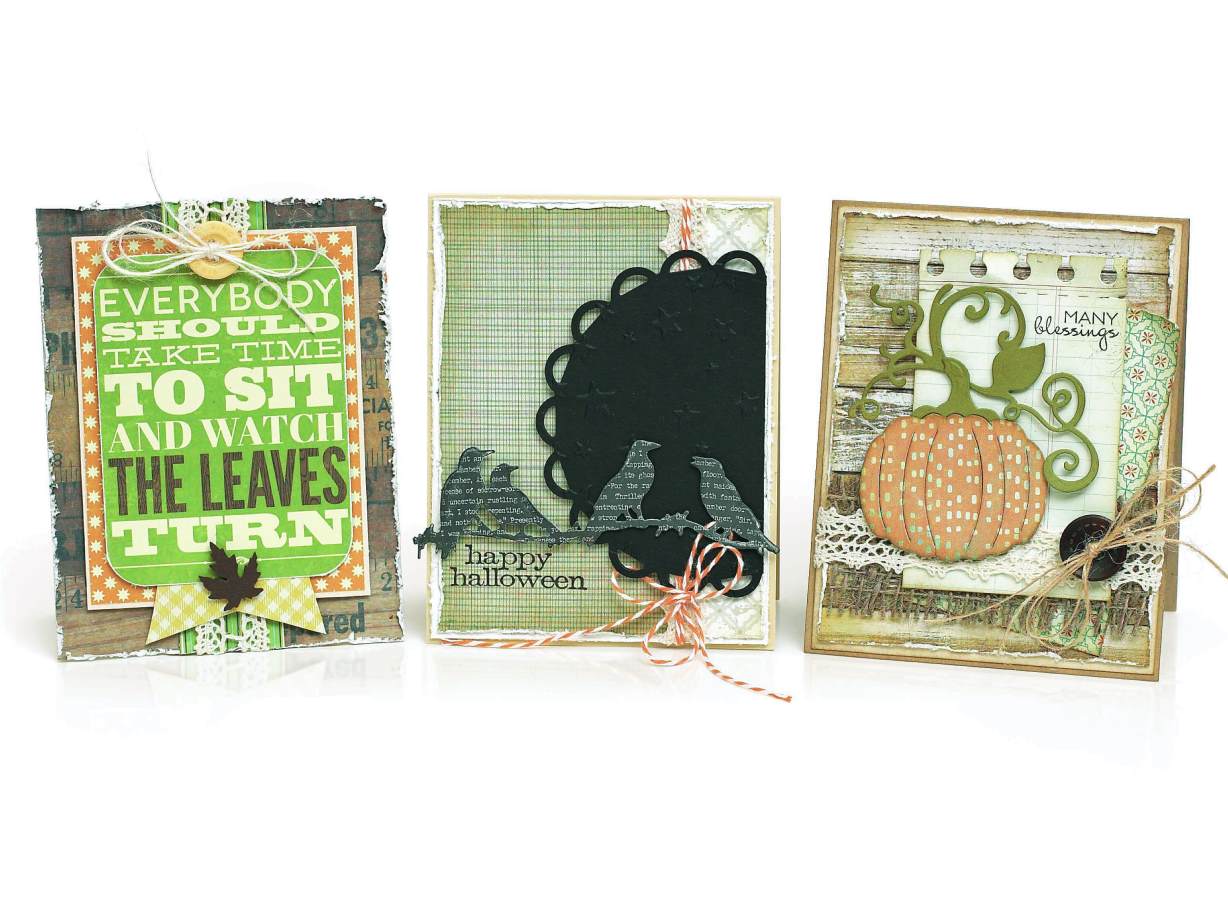
happy halloween
1 Make a 4.25”x5.5” base from cream cardstock,
with the opening on the bottom.
2 Trim a 4.125”x5.375” mat from white cardstock.
Distress edges.
3 Trim a 3”x5.25” piece and a 1”x5.25” piece from
neutral patterned paper and distress the edges.
Adhere the larger piece to the left side of the
white mat and the smaller piece to the right side
as shown.
4 Adhere crochet tape over seam to cover. Wrap
orange baker’s twine around the crochet trim and
tie off in a bow. Adhere assembly to card base.
5 Die cut a 4.25” scallop circle from black card-
stock. Dry emboss. Trim off one-third of the circle
and adhere remaining piece to the card, flush with
the right side, using dimensional adhesive.
6 Die cut crows from black text paper and adhere
to card with dimensional adhesive.
7 Stamp sentiment in lower left corner of card, using
black ink.
watch the leaves turn
1 Make a 4.25”x5.5” card from ivory cardstock,
with the opening on the bottom.
2 Trim a 4.25”x5.5” piece of ruler patterned paper,
distress edges and adhere to card base.
3 Trim a 1.25”x5.5” strip of green patterned paper
and adhere vertically to center of card as
shown.
4 Adhere a 6.5” length of crochet trim over the
green strip, wrapping and securing the ends to
the back of the ruler paper panel.
5 Trim a 3.5”x4.5” piece from orange patterned
paper, mat with ivory cardstock and adhere to
center of card, using dimensional adhesive.
6 Trim a 2.25”x1” piece of yellow patterned paper
and notch one end to create a banner. Adhere
to bottom of orange piece as shown.
7 Round corners of the sentiment panel and
adhere to card.
8 Adhere yellow button, tied off with jute
string, to the top of the sentiment panel. Die
cut a .75” brown leaf and attach to bottom of
sentiment piece as shown.
supplies
CARDSTOCK,
Stampin’ Up!;
PATTERNED PAPER,
Crate Paper, BasicGrey;
STAMP,
Verve Stamps;
INK,
Ranger Ink, Tsukineko;
DIES,
Sizzix, The Cat’s Pajamas;
JUTE, CROCHET TRIM, May Arts;
DISTRESSING TOOL,
Tonic
Studios;
ADHESIVE,
Scrapbook Adhesives by 3L;
OTHER,
burlap, button
many blessings
1 Make a 4.25”x5.5” card from kraft cardstock, with
the opening on the bottom.
2 Trim a 4”x5.25” piece of wood grain patterned pa-
per and distress edges. Mat with ivory cardstock
and adhere to card base.
3 Trim a 2.5”x4.25” piece of coordinating patterned
paper, distress edges, and adhere to card at an
angle as shown.
4 Adhere a length of burlap ribbon horizontally
along the bottom one-third of the card.
5 Trim a 2.5”x4.25” piece of notebook patterned
paper. Die cut top edge with a notebook border.
Stamp sentiment onto notebook piece, in the
top right corner, using black ink. Using dimen-
sional adhesive, adhere sentiment piece to card.
6 Adhere a length of crochet trim horizontally
over the burlap ribbon and embellish with a but-
ton that has been tied off with jute string.
7 Die cut a vine from green cardstock. Die cut
two pumpkins, one from green cardstock and
the other from orange patterned paper. Cut
the stem off the orange pumpkin and layer the
remaining piece onto the green pumpkin. Adhere
vine to pumpkin piece, then adhere assembly to
the card, using dimensional adhesive.