
Welcome to a celebration of card making! Each year we thank Paper Crafts magazine for creating this great holiday where we can bring designers, manufacturers and readers together to showcase a variety of styles, designs, tips and inspiration. This year again, we teamed up 12 great PageMaps sketches with 12 amazing designers to bring you a card for each month for the entire year!
Welcome to a celebration of card making – one of our favourite days of the year! This day first began in 2006 and was founded by Paper Crafts magazine as a way for cardmakers, manufacturers, and retailers to join together and celebrate this wonderful hobby! And have we got a day planned for you! We teamed up 12 great PageMaps sketches with 12 amazing designers to bring you a card for each month for the entire year. But wait…that’s not all! (said in our best infomercial voice!) We have also provided you with instructions for each card and you can download the pdf of each card, sketch and instructions that you can print for future reference!
So as not to keep you in suspense any longer…here are some beautiful cards just for you!


winter greetings
by kelly goree
- Trim a sheet of cream cardstock to 10”x7”. Fold in half to form a 5”x7” vertical card base.
- Trim a sheet of light grey paper to 5”x7” and adhere to the front of the card.
- Trim a floral sheet of paper to 4”x6” and adhere it to the front of the card.
- Trim a piece of light grey paper to 3.5”x5.5” and adhere centered to the floral piece.
- Using a scallop border punch, trim a piece of light blue paper to ½”x5.5”. With scallops to the left, adhere vertically 1” from the left side.
- Trim a ¼”x7” strip of striped paper against the grain so there are more stripes per strip. Adhere vertically so that it is flush with the right (straight) side of the scalloped strip.
- Trim a ¼”x7” strip of cream paper then adhere vertically so that it is flush with the right edge of the striped strip.
- Trim a 2”x5” piece of light blue paper and cut into a bracket shape. Run paper through embossing folder then adhere within the light grey block in the center of the card so the straight edge is flush with the cream strip as shown.
- Print greeting “winter greetings” onto cream paper. Trim into 3”x½” flag. Mat flag with taupe paper. Adhere horizontally across the card so that it is 2” from the top of the card and flush with the cream strip.
- Adhere chipboard snowflake just above the greeting ½” from the left side and ¾” from the top.
- Wrap brown twine vertically around the card over the snowflake, thread through a light blue button and tie in a bow.
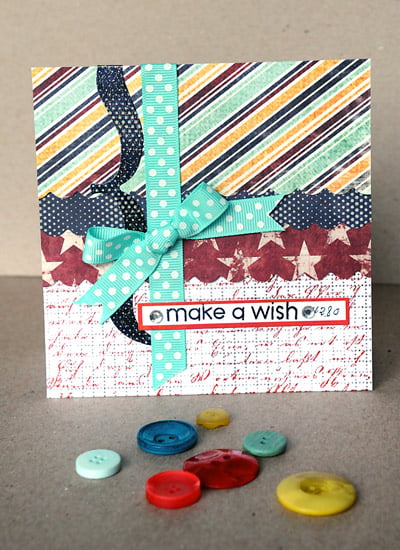

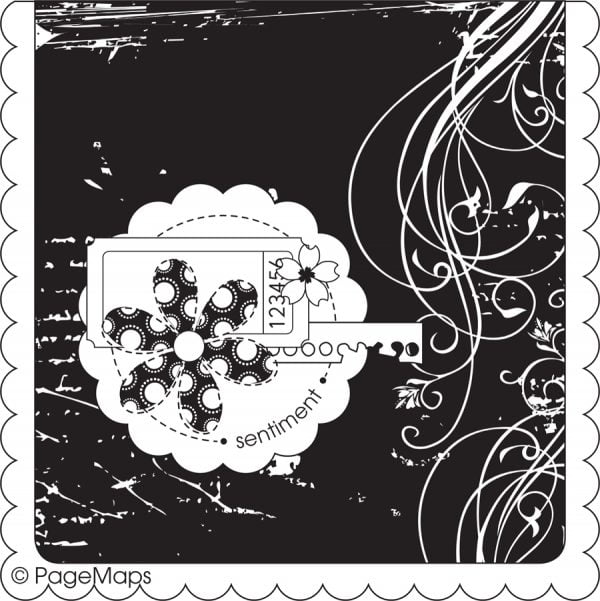
make a wish
by vicki boutin
- Create a 5” x 5” card base.
- Stamp the card with a script image.
- Trim three strips of patterned paper using a border punch and layer the strips at the top of the card.
- Add a ribbon and bow.
- Stamp a label sticker and attach to card. Add rhinestones.
- Add a bracket sticker.


happy easter
by kimber mcgray
- Trim a piece of white cardstock 8.5”x6” and fold to create a 4.25”x6” card base.
- Adhere the 4”x6” yellow pre-cut patterned paper piece to the card front.
- Trim a piece of white cardstock 2”x6” and stamp yellow and pink flowers on the background. Add self-adhesive pearls to the centres of a few of the flowers.
- Using a Fiskars border punch, punch along 2-6” long strips of blue cardstock and adhere to the back of the white stamped piece of cards stock as shown in the image. Adhere to the front of the card.
- Trim a white piece of cardstock 1”x5”, stamp the ‘Easter’ sentiment with black ink and add the ‘Hoppy’ sentiment in blue alpha stickers. With a pair of scissors, cut a notch out of the left end and adhere to the card front as shown. Draw a black border around the sentiment strip.
- Cut a tag down to 4.25” and adhere to the front of the card. Draw a stitching line around the tag in black ink. Tie a bow with white string on the tag.
- Adhere the die cut bunny to the front of the tag and add a self-adhesive pearl to the bunny’s bouquet.


thinking of you
by kathy thompson
- Cut card to measure 5.5” x 4”.
- Select two coordinating pieces of patterned paper.
- Cut one piece of patterned paper 3.5”x4”; round inside corners.
- Cut the second piece of patterned paper 1.75” x 4”; round inside corners.
- Adhere patterned paper to card.
- Adhere rub on to a sticker.
- Adhere sticker to the card using pop dots.
- Adhere Flair embellishment.
- Finish by lining card with coordinating cardstock.


#1 mom
by summer fullerton
- Cut 6”x8” card base and fold in half to create card.
- Cut green patterned paper approximately 3-5/8”x5-5/8”, cut teal patterned paper approximately 3-5/8”x2” and adhere to the top of the green patterned paper.
- Round the corners and cover the seam with brown ribbon. Adhere to card front.
- Punch scallops and circles from cardstock and patterned paper and layer with pop dots.
- Cut pound symbol and number with Cricut/Plantin Schoolbook cartridge adhere to circle and layer mom stickers as shown.
- Cut two strips approximately 1”x3½ from coordinating blue patterned paper to make the tails of the ribbon adhere to the back of the large scallop circle.
- Trim and gently curl the tails of the ribbon as shown and adhere to the card front.


you are no. 1 dad
by emily pitts
- Cut a 12” x 6” strip of cardstock. Score at 6” and fold so you have a 6” x 6” card.
- Stamp half the front with large polka dot stamp, using spray ink directly on the stamp.
- Cut a 5 3/4” x 2 7/8 strip of patterned paper.
- Attach to front of the card, opposite the stamped pattern.
- To make medallion, cut a strip of cardstock 2”x 12”, border punch one edge. Accordion fold the strip and attach the ends w/ liquid adhesive, then form a circle. Punch a 3” scalloped circle, attach to the accordion flower with machine stitching in a continuous circle. Spray a wooden star w/ yellow mist, stamp with red ink. Adhere with liquid adhesive 5o medallion. Add letter stickers. For ribbon tails, cut a 2” x 1” strip, pleat once on one end, dovetail the other and attach to the back side of the medallion.
- Wrap the card down the middle of the two patterns with twine, adhere by machine stitching around the outside of the card a few times.
- Attach the medallion with liquid adhesive.
- Add the word “DAD” just under the medallion.
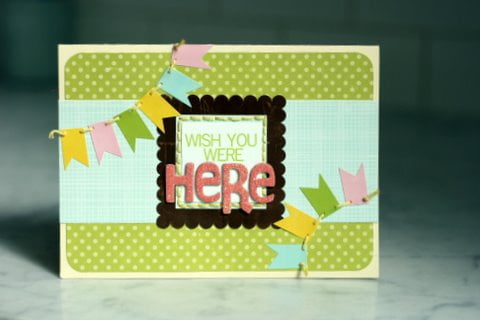

wish you were here
by lisa kisch
-
Cut one rectangle of patterned paper, 6.75”x4.75”, and adhere to card base.
-
Cut one strip contrasting patterned paper 3”x7” and adhere to the centre of the card.
-
Print part of the sentiment on photo paper and cut down to a square 1 5/8”.
-
Stitch around the title, then add a frame sticker.
-
Add the last word of your sentiment in letter stickers.
-
Create two banners using pennant stickers.
-
Using a paper piercer, punch holes near the corners of each pennant.
-
Stitch through the banner with the same embroidery floss as in the title.


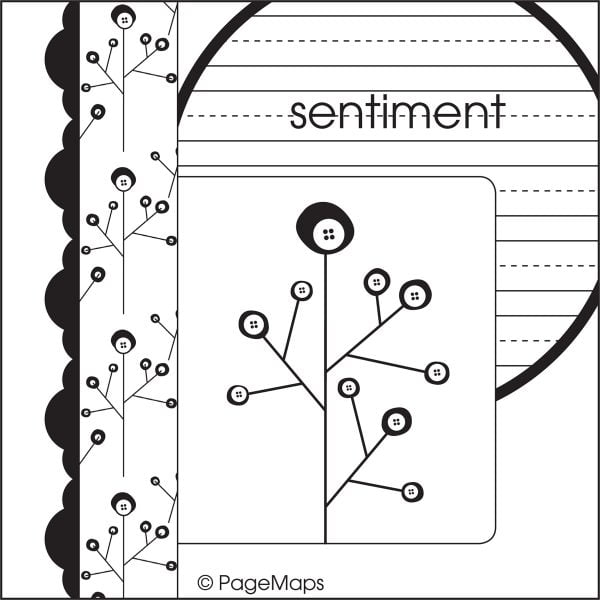
a little bird told me
by davinie fiero
-
Trim a card base for a 4.25 x 5.5 inch card.
-
Trim the green patterned paper at 4 inches wide. Using a scalloped border punch, trim one of the ends, and then trim it for a final size of 4 inches wide by 5.25 inches tall. Ink edges and adhere to card base. Stitch edges.
-
Trim patterned paper to fit inside chipboard frame. Trim bottom edge with scalloped border punch.
-
Layer sentiment sticker. Adhere frame to patterned paper.
-
Wrap frame with ribbon and tie in a knot.
-
Adhere frame to card base, centered top to bottom and on the left side of the card.
-
Adhere two chipboard birds as shown.
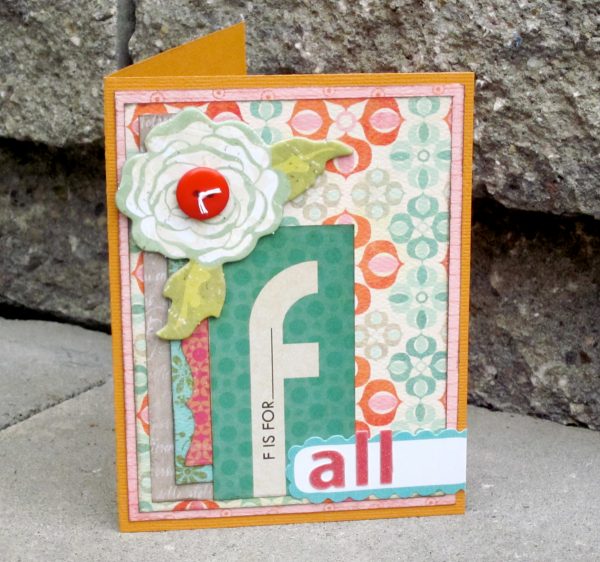
f is for fall
by kerry mcrorie
- Make a 5.5 x 4” card from cardstock.
- Cut a 5.25 x 3.75” from pink paper; ink edges.
- Cut a 5 x 3.5” from graphic patterned paper; ink edges.
- Cut a 4.5 x 1” strip from grey paper; ink edges.
- Cut a 4 x .5” strip from blue floral paper; ink edges.
- Punch a 2.5 x .5” strip from pink paper; ink edges.
- Layer all pieces on top of one another as shown.
- Cut out “f is for” rectangle from patterned paper; ink edges; adhere as shown.
- Adhere label sticker and remaining letters for sentiment.
- Adhere chipboard flower.
- Thread floss through center of a red button; adhere in center of flower.
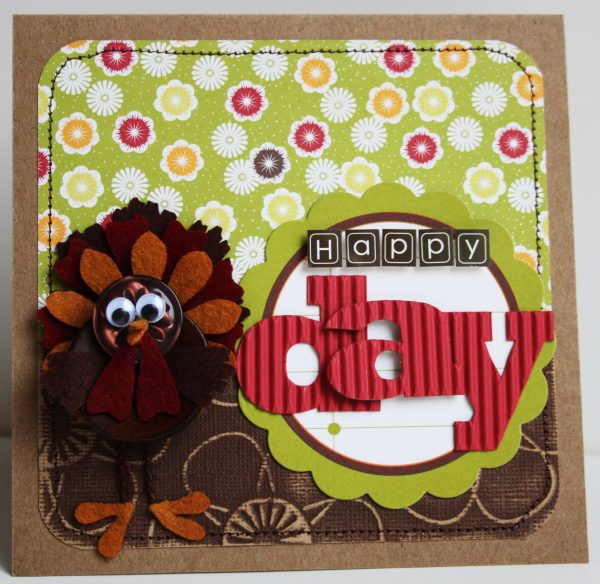
happy turkey day
by sarah hodgkinson
- Cut a 5.5” x 11” piece of kraft paper. Score and fold the card base so it measures 5.5” square.
- Cut a 5.5” x 3” piece of Fresh Garlic Clove by Jillibean Soup. Cut a 5.5” x 2” piece of French Roast Flowers Core Impressions cardstock by Core’dinations. Using sandpaper or a sanding block, lightly sand the Core’dinations cardstock to reveal the coordinating core. Round and bottom two corners and attach both to the kraft base. Optional: hand stitch or sew around the edge, 1/4” from the edge.
- Attach a large Pasta Fagioli Journaling Sprout to the right hand side of the card. Using foam layering squares, attach the Pasta Fagioli letter cardstock stickers, “Happy”. Also, attach the red Corrugated Alpha letters “d” and “y” directly to the Journaling Sprout, while you attach the “a” using foam layering tape.
- Create the Cool Bean turkey critter by Glue Dotting two googlie eyes to the small brown button. Hand cut the small, medium and large Harvest Bean Seeds (felt flowers) or leave plain to create the waddle, wings, feathers and feet of the turkey. Cut a 4” piece of Bean Stalk brown twine and use it to create the legs of the turkey. Attach all turkey parts with Glue Dots and use Glue Dots to firmly secure the turkey to the card. Gobble, gobble!

get well
by erin lincoln
- Cut 4×4 card base. Stamp left edge with Embellishment border in Antique Linen Distress Ink.
- Adhere polka dotted patterned paper to card. Cover border with Sweet Blush ribbon.
- Stamp and heat emboss pink circle element. Distress edges. Stamp sentiment. Punch out and adhere to card.
- Die cut flourish shape, stamp in Dark Chocolate ink. Distress edges with Antique Linen Distress Ink. Adhere to card.
- Thread button and adhere to card.
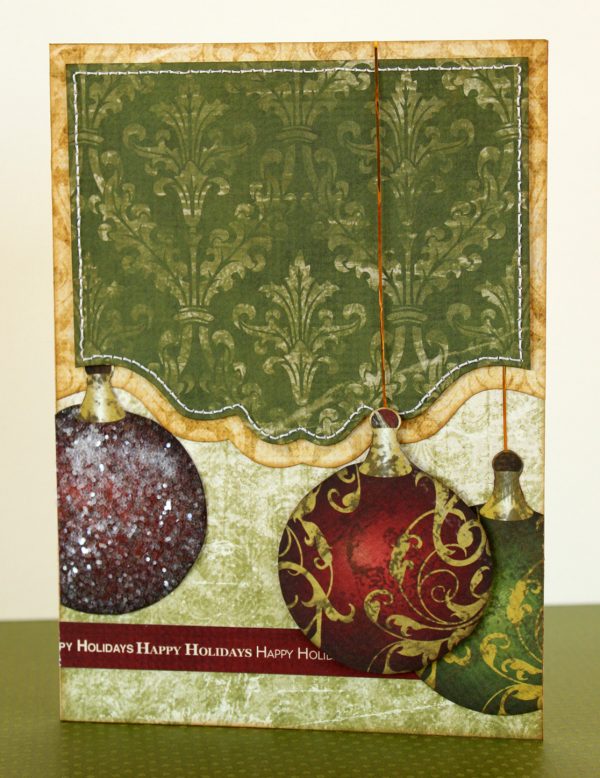
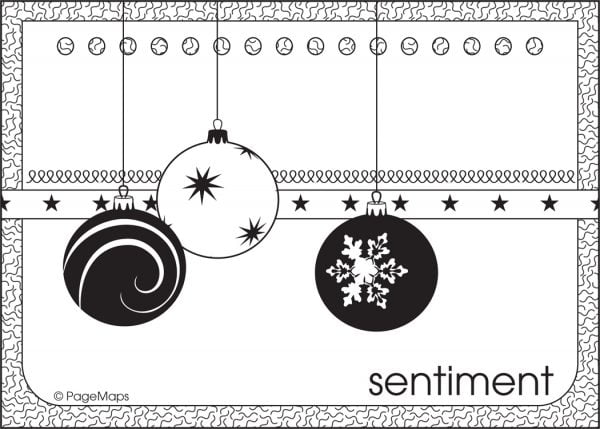
happy holidays
by becky fleck
- Trim a piece of ivory cardstock to 10”x7” and fold it in half with the opening on the right.
- Trim a 5”x4” piece of Bo Bunny Noel Ornaments (the damask pattern) and adhere it to the bottom front of the card.
- Trim a 5” x 4.5” piece of Bo Bunny Noel Memories (gold side). Trim off a decorative edge from the bottom. Trace this piece onto a 4.5” x 4” piece of Noel Joy (green side) and trim inside the traced line 1/4”. Adhere the green piece to the gold piece. Sew along the interior edge of the green piece either by machine or by hand.
- Trim off the strip of “Happy Holidays” words from the Noel Cut Outs and adhere it to the bottom of the card as shown.
- Trim out the three large ornaments on the Bo Bunny Noel Joy paper. Cover the solid red ornament with coarse glitter. Attach gold tinsel to the back of each ornament.
- Referring to the photo, arrange the ornaments on the face of the card, adhering the red patterned ornament with pop dots. Trim off the excess paper that falls off the left and right sides of the card.
And we have one more card sent to us by one of our readers, Kerry Prill! This card was so adorable we just had to put it in our fall issue? We mistakenly did not put Kerry’s name on it so we thought this would be a perfect opportunity to thank her for sending it to us!
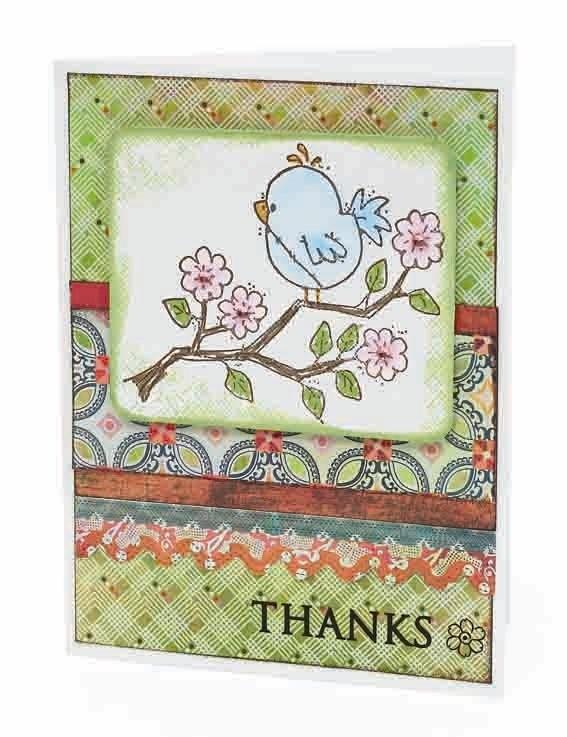
thanks
by kerry prill
- Trim a piece of white card stock to 8.5″ x 5.5″ and fold in half to create a 4.25″ x 5.5″ card base.
- Trim a piece of green patterned paper to 4″ x 5.25″. Ink edges with green ink and adhere to background, leaving an 1/8″ border.
- Trim a piece of red patterned paper to 2″ x 4″. Ink edges with brown ink and adhere approx. 1.5″ down from top.
- Trim a piece of red/blue patterned paper to 1.5″ x 4″. Ink edges with brown ink and adhere (centered) over red paper.
- Trim a piece of blue paper to .25″ x 4″ and adhere directly under red paper.
- Using a Stampin’ Up small scallop border punch, punch a .5″ x 4″ strip of red floral paper and adhere directly under blue paper.
- Stamp desired image onto white cardstock and trim, leaving a 1/4″ border around image.
- Colour image — I used a combination of markers for the branches & leaves, plus chalks for the flowers & bird. Copics work well, too!
- Apply self-adhesive ‘bling’ to centres of flowers.
- Using a makeup sponge, smudge green ink lightly around edges of stamped image.
- If desired, lightly spray Krylon Matte Finish over stamped image to prevent chalk from smudging or transferring.
- Attach several pop dots to the back of stamped image and adhere to card.
- Apply ‘thanks’ rub-on.
