Basic HTML Version


22
scrapbook & cards today
•
fall 2013
the 3 t’s
Machine-stitching can be intimidating, even to
the most seasoned scrapbooker, but have no
fear
!
Nicole, our resident sewing expert, has
some tips to help you conquer your sewing
trepidations!
Make sure your sewing needle is sharp and
thin. A size 9 or 10 works best.
Using permanent or temporary adhesive,
glue all of your layers together so they do
not shift when you sew.
When you have finished sewing on your
page, turn it over and tape over the threads
at the beginning and end of your stitching.
Sew borders directly onto the trimmed
paper pieces or embellishments before
adhering them to your page.
A medium-length stitch works best to
avoid tears in your paper.
Try different thread colours for a fun,
unique look.
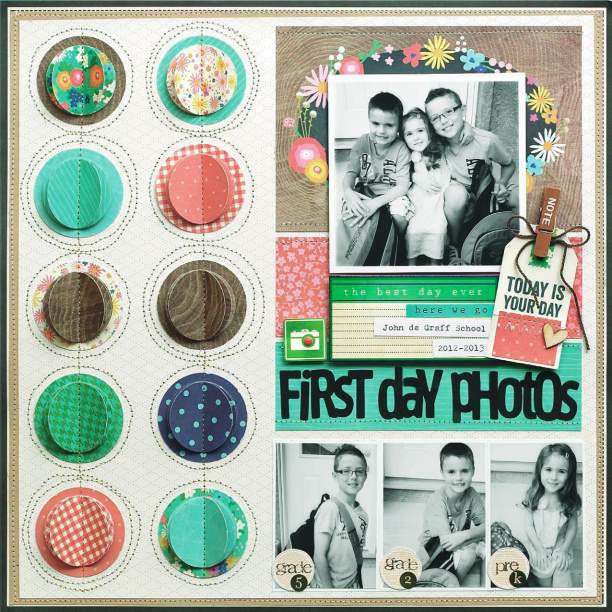
Nicole created her school grade
labels using a combination of
stamping and mini stickers, and
we loved the look!
machine
-stitching
first day photos
BY NICOLE NOWOSAD
supplies
PATTERNED PAPER, CHIPBOARD, STICKERS, DIE CUT SHAPES, CLOTHESPIN,
Pebbles;
STICKERS,
Authentique;
STAMPS,
Technique Tuesday;
ENAMEL DOTS,
My Mind’s Eye;
WOOD
VENEERS,
Studio Calico;
INK,
Hero Arts;
ADHESIVE,
Scrapbook Adhesives by 3L
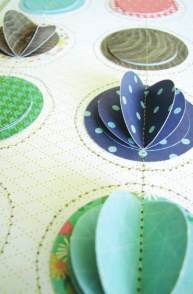
Place the largest
circles onto your
page and trace
around each.
Punch out 3 sizes
of circles, punching
the largest from
scrap paper.
Layer 1 medium and
3 small circles
inside the traced
circle. Sew down
center as shown.
Gently pull up
on the
top 3 layers
of circles for a 3D
effect.