Basic HTML Version


www.scrapbookandcards.com
45
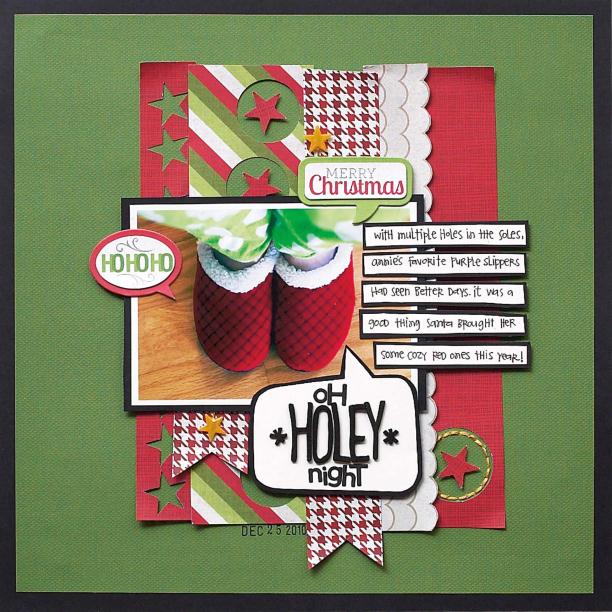
oh holey night
BY EMI LY PI T T S
supplies
CARDSTOCK, PATTERNED PAPER, CHIPBOARD SHAPES;
We R Memory Keepers;
CARDSTOCK,
Bazzill
Basics;
LETTER STICKERS,
American Crafts, Jillibean Soup;
STAR PIN,
Maya Road;
INK,
Tsukeniko;
ADHESIVE,
Xyron
got scraps?
Layered scraps yield stellar results
Always a reader favourite, our “Got Scraps” article shows quick and practical ways to use
up your scrap stash. As an added bonus, we’ve included handy sketches from PageMaps.
the 3 i’s
1 Mat an 11.5” square piece of green cardstock
onto a piece of black cardstock to form a
base.
2 Mat a 4”x6” photo onto black cardstock.
3 Trim five 1” to 2” strips of various patterned
scraps to 7” long. Scallop the edge of one 1”
strip. Punch circles and stars from three strips
as shown. Cut a V notch in the end of the
last strip.
4 Adhere the strips to the center of the base as
shown.
5 Trim a speech bubble from white cardstock,
matting it in black for definition. Using a
combination of orphan letter stickers, spell
out your title inside the speech bubble.
6 Adhere the matted photo to the left side of
the paper strips.
7 Adhere the speech bubble below the photo,
as shown, using foam adhesive.
8 Punch out small stars from red scraps of
cardstock and adhere them to the negative
space in the paper strips using foam adhesive.
9 Add some hand-stitching inside one of the
negative circles.
10 Journal on white strips of cardstock and mat
each strip with black cardstock. Adhere the
strips to the right of the photo using foam
adhesive.
11 Embellish the layout with a star pin, a date
stamp and additional speech bubbles.
Making your own speech
bubbles is very easy. Simply
trace a desired shape and
add a “V” to one edge of the
shape. We loved how Emily
matted her speech bubble in
black to make it stand out.