Basic HTML Version


www.scrapbookandcards.com
49
supplies
CARDSTOCK, PATTERNED PAPER, SENTIMENT
STICKER, CRICUT CARTRIDGE,
Creative Memories;
STAMP,
Anna Griffin;
VELVET RIBBON,
My Mind’s Eye;
EYELETS,
CROP-A-DILE,
We R Memory Keepers;
INK,
Ranger;
DIE
CUTTER,
Cricut;
ADHESIVE,
American Crafts
supplies
CARDSTOCK, HEXAGON PUNCH,
Creative Memories;
PATTERNED PAPER,
Echo Park, Jillibean Soup, We R Memory
Keepers;
CARDSTOCK STICKERS,
Echo Park;
BRAD,
We R
Memory Keepers;
FOAM ADHESIVE,
Creative Memories;
ADHESIVE,
Xyron
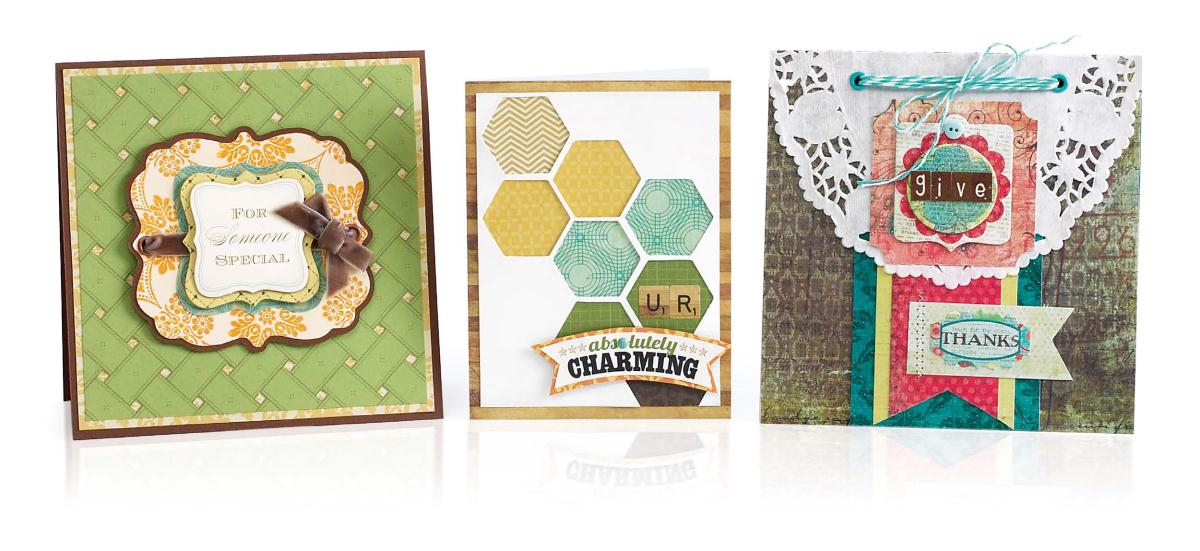
ur absolutely charming
1 Trim a 4.25” x 5.5” card base from white cardstock
that opens on the right side.
2 Trim a 4.25” x 5.5” piece of patterned paper and
adhere it to the front of the card.
3 Trim a 3.875” x 5.125” piece of white cardstock and
punch it with the hexagon place-n-punch several
times as shown.
4 Add various scraps of patterned paper to the back
of the hexagon openings, starting with lighter
colors at the top, left and ending with darker
colors at the bottom, right. Adhere the piece to
the front of the card.
5 Add cardstock stickers to form a sentiment and
embellish with a brad.
for someone special
1 Trim a 6” square card base from brown card-
stock with opening on the bottom.
2 Trim a 5.75” square piece of golden yellow
patterned paper and adhere it to the center of
the card.
3 Trim a 5.5” square piece of green basket weave
patterned paper. Using a craft knife, cut out
the empty spaces where the weave intersects
and adhere it to the card.
4 Die cut a French label from ivory cardstock.
Using honey colored ink, stamp a background
pattern onto the label. Mat the label onto
brown patterned paper.
5 Add eyelets to the left and right sides of the
matted label shape using a Crop-A-Dile and
thread them with ribbon as shown.
6 Add a sentiment sticker over the ribbon and a
bow on the right side. Adhere the label shape
to the center of the card with foam adhesive.
supplies
CARDSTOCK, PATTERNED PAPER, CARDSTOCK
STICKERS, CHIPBOARD TAG, DOILY, TWINE, EYELETS,
CORNER PUNCH,
We R Memory Keepers;
BUTTON,
Fancy
Pants;
ADHESIVE,
GluDots, Xyron
thanks
1 Trim a 6” square card base from brown cardstock
with opening on the bottom.
2 Trim a 6” square of brown patterned paper and
adhere it to the front of the card.
3 Trim a 1.75” x 3.5” strip of red patterned paper and
mat it to a 2.25” x 3.5” strip of yellow patterned
paper . Notch the ends as shown.
4 Trim a 3” x 3.5” piece of teal glitter paper and
adhere it vertically to the bottom, center of the
card. Adhere the pennant from step three to the
center of the teal strip.
5 Adhere half of a doily to the top of the card.
6 Trim a 2.625” square piece of salmon patterned
paper, stub punch the corners, and adhere it to
the center of the doily. Layer a tag, a button, and
letter stickers to form a sentiment.
7 Add two eyelets at the top of the doily and thread
twine through them, tying the ends in a bow.
8 Trim a 1” x 2.75” strip of beige patterned paper.
Notch one end and add a cardstock sticker senti-
ment. Machine stitch it to the paper strips at
the bottom of the card.
the 3 i’s